Cyberpunk 2077 is a title that needs no introduction, everyone in the gaming world knows about this title from CD Projekt Red. The main reason why everyone has high hopes for this game is the game is built by the same studios behind the Witcher 3. The game has been in the works since 2012, there have been numerous delays, the release date has been pushed a bunch of times already. However, the day has come, the game is finally released.
Similar to every AAA title, this game is not free from problems. Initial reviews and impressions have detailed that there are issues in the game, bugs and weird things that we’ll report as we’ll find out. Problems aren’t exactly new for AAA titles, problems are known to arise since developers can’t test the games on a huge set of machines. The configuration of every PC is so different that the developers cannot actually test everything. That’s why developers take reports and push patches in the following days.
Patch 1.5 & The Console Next-gen update is here. Rather than fixing things, seems like CD Projekt Red has again managed to break things. The game is suddenly facing stuttering, crashing, mouse-lag related issues. The tweaks we’ve mentioned below might help you in boosting your FPS by a bit. Go ahead and apply the fixes.
Cyberpunk 2077 Lag Fix

First things first, let’s find out what the system requirements of the game are:
Cyberpunk 2077 System Requirements
Minimum:
- Requires a 64-bit processor and operating system
- OS: Windows 7 or 10
- Processor: Intel Core i5-3570K or AMD FX-8310
- Memory: 8 GB RAM
- Graphics: NVIDIA GeForce GTX 780 or AMD Radeon RX 470
- DirectX: Version 12
- Storage: 70 GB available space
- Additional Notes: SSD recommended
Recommended:
- Requires a 64-bit processor and operating system
- OS: Windows 10
- Processor: Intel Core i7-4790 or AMD Ryzen 3 3200G
- Memory: 12 GB RAM
- Graphics: NVIDIA GeForce GTX 1060 or AMD Radeon R9 Fury
- DirectX: Version 12
- Storage: 70 GB available space
I am not sure if these recommended system requirements are correct or not, guess we’ll find out as we get the game up and running on more systems. As usual, we will report the graphic performance on GTX 1060, 1080TI, 2060, 2070 Super and 3070.
Change Graphic Card Settings
Below are the settings for AMD and Nvidia graphics card users, apply these settings for the best performance.
For Nvidia Users
- Open up Nvidia’s Control Panel. Right-click on desktop > click Nvidia control panel
- Click Manage 3D Settings > Program Settings
- Find “Cyberpunk 2077”, you can manually add the game if it’s not in the list
- Now, make the following changes:
Monitor Tech: G-Sync (If available)
Maximum Pre-rendered frames: 2
Threaded optimization: On
Power Management: Prefer Maximum Performance
Texture Filtering – Quality: Performance
For AMD Users
- Anti-Aliasing Mode: Use Application settings
- Anti-aliasing Method: Multisampling
- Morphological Filtering: Off
- Anisotropic Filtering Mode: Use application settings
- Texture Filtering Quality: Performance
- Surface Format Optimization: On
- Wait for V-sync: Off
- OpenGL Triple Buffering: Off
- Shader Cache: AMD optimized
- Tesselation Mode: Override application settings
- Maximum Tesselation Level: Off
- GPU Workload: Graphics
- Chill: Off
- Frame Rate Target Control: Disabled
These settings should be good enough for you. Try tweaking a bit with the priority of the application, this also tends to give a little FPS boost.
Update Device Drivers
Whenever a new game makes its arrival, especially when it’s a AAA title, Nvidia is known for pushing their optimized updates for the best performance with their graphic cards. I am not sure about AMD because I’ve never used an AMD card. Below are the links for downloading the latest drivers.
Since this is a AAA title, I am sure Nvidia will be pushing an update with compatibility for this game. Make sure to keep an eye on your device driver updates.
Cyberpunk 2077 FPS Drops Fix
Another thing to check is, to open up the task manager and check your memory and disk usage. Close all applications (non-windows) that are eating your memory and using disk drive. If you are still stuttering with everything looking fine then you should probably wait for the hotfix update, which should be pushed out shortly.
These problems are mostly caused due to high disk usage and can be fixed immediately by moving the game to SSD or closing apps that are using “disk”.
Disable Full-Screen Optimization & High DPI in Windows 10
Full-screen optimization and DPI settings come pre-configured with Windows 10. These are known for causing trouble with games leading to several issues. To disable:
- Locate the game installation
- Find the .exe file of the game
- Right-click > Properties > Compatibility Tab
- Tick the “Disable Full-Screen Optimizations” tab
- Now, click the “Change high DPI settings” button
- Tick “Override high DPI scaling behavior” and select “Application” from the drop-down menu
- Save Settings.
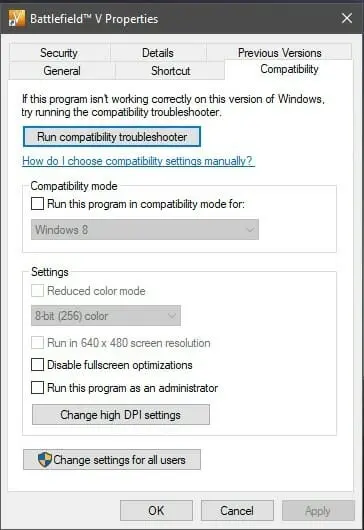
Example of BF5.
Tone Down Game Settings
The general rule of thumb for every game is if you are lagging it is always recommended to tone down the settings. Play around a little bit with the settings, turn down shadows and textures, this should help.
Turn off Game Mode
Windows says that the Game mode helps in optimizing all-around windows processes, windows updates and other windows related stuff while running games if you have the game mode enabled. But this isn’t factually true, the game bar has been known for causing issues related to FPS. So it’s better to turn it off if you are not using it.
- Click Start > Settings > Gaming
- On the Game Bar, set “Record game clips, screenshots, and broadcast using Game bar” to off.
- Now head to the Captures tab set the “Record the background while I’m playing a game” to Off.
- Lastly, click on the Game Mode tab, and turn it off.
P.S. Nvidia’s Shadowplay is better for capturing game clips.
Update Windows
A recent couple of updates were weird and broke a lot of games, to fix those issues, Windows has already pushed out hotfixes and you can download them right away. If you are running an older version of Windows, I’d recommend you download the updated version.
There was also an update that caused windows to use up a lot of RAM for its search bar’s function called Cortana. This also has been fixed, you just have to update.
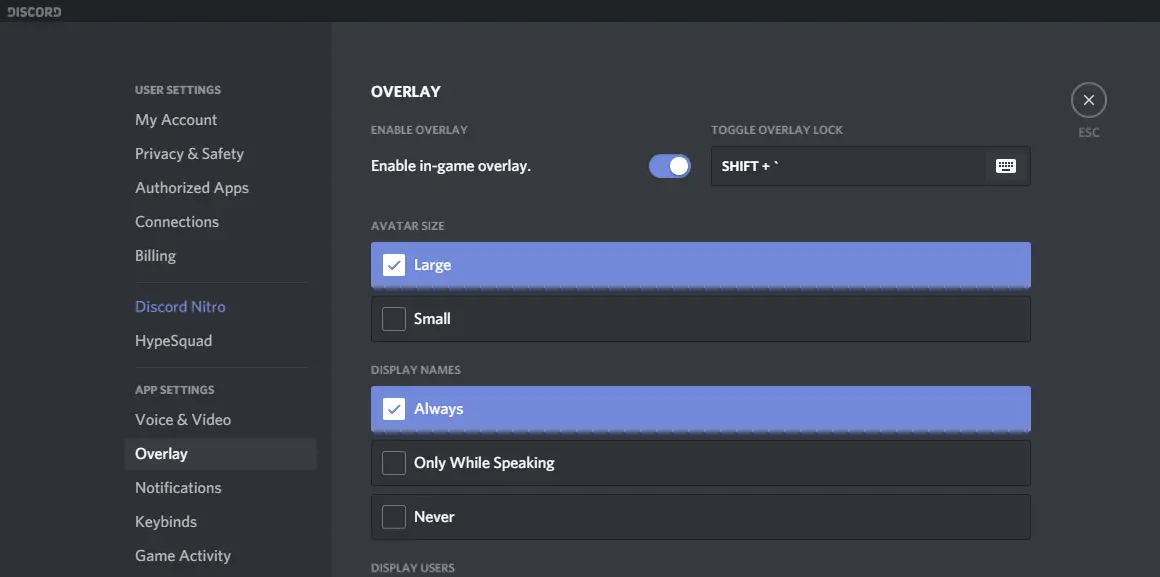
Disable Discord in-game overlay
If you are using Discord like me, then I’d recommend you to change a few things. One such thing is, discord overlay, it’s not really something you need at all times. I use a two-monitor setup, so the overlay is useless for me. It is known for causing FPS related issues.
Disable Hardware Acceleration in Discord
- Open Discord
- Click on User Settings > Appearance
- Click on the Hardware Acceleration radio, this will turn it off.
Disable Discord in-game Overlay
- Open Discord
- Go to Overlay under App Settings
- Click on the “Enable in-game overlay”, this will turn it off.
Increase Game Priority
This is an old-school method of boosting FPS in certain games, this only affects the CPU relying Games.
- Press CTLR + Shift + ESC to open task manager
- Find Cyberpunk 2077’s and right-click > go to details
- Now right-click on the process’s .exe file and set priority to “high”.
This will prioritize your game over other windows applications and provide you with a little boost.
Fix COD Vanguard Lagging in Windows 11
These steps are specific to Windows 11 users.
Disable Core-Isolation on Windows 11
Core Isolation is a new feature built-in Windows 11 that protects your PC from untrusted applications and drivers. The tradeoff is obviously the performance. But this is not going to be an issue for anyone that doesn’t download anything from untrusted sites.
Here’s how you can disable it:
- Click on Start Menu button and select settings
- Click Privacy and Security > Windows Security > Device Security
- Here you will find Core Isolation, click on Core isolation details

- On the next screen, you will find a radio button for “Memory Integrity”, just turn it off.
You’ve successfully disabled VBS on Windows 11. Many users on Reddit have reported this to significantly improve performance for many games. We’re talking about improvements of about 20-30 fps straightaway.
Enable Game Mode
We’ve noticed huge improvements in the Game Mode in Windows 11. For Windows 10, we suggest disabling both Game mode and game bar, whereas this option should be enabled on Windows 11.
To Enable: Just type game mode in search and enable it.
Everyone has high hopes for this game, after waiting for so long, the game has to certainly deliver. I’ve been watching the steam best selling list for months now, and the game has been sitting in the top 10 for a long time. Let’s hope for the best, do comment below if you have been waiting for this game.
We hope this article helped you out in fixing the performance issues. Comment below with your specs if you’re still having troubles.
CATEGORIES: Gaming Guides

About the Author
Vikas Bhatt
Gaming and PC troubleshooting writer. Tests fixes, checks settings, and writes step-by-step guides.
Previous Post
Cyberpunk 2077 - PS5/PS4 Stuck on Tutorial, R3 Button Not Working
Next Post
Cyberpunk 2077 - Keybinds Locked, How To Change?
Related Fixes
View All